how to send an email using Next.js (app directory approach), integrating Resend API, along with a form containing input fields for the subject, message, and recipient email.
1. Setting Up the Project
Before we start, ensure you have the following installed:
- Next.js v14 or above (app directory support).
- Resend: The Resend API will handle the email sending process.
- You’ll need an API key from Resend
- You’ll also need to verify your own domain (if you want the email to be submitted from your own domain)
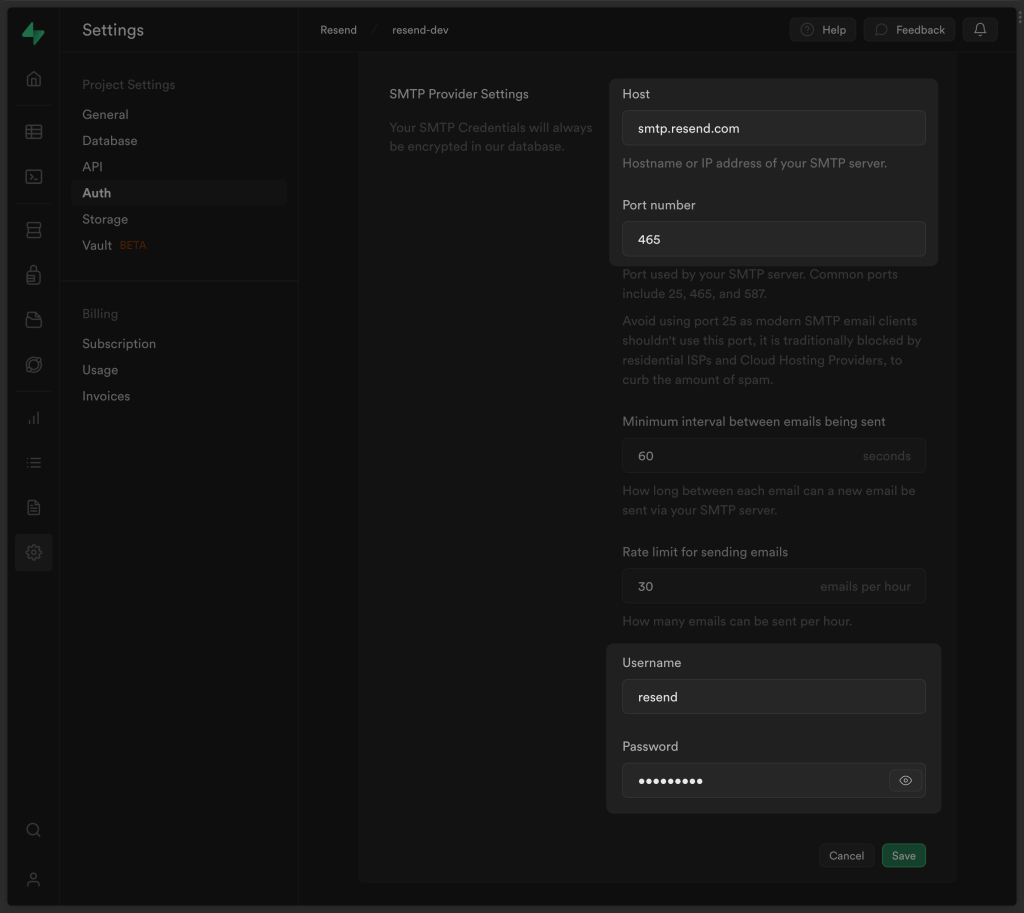
The information you’ll need from Resend To configure your supabase customize SMTP:
Host: smtp.resend.com
Port: 465
Username: resend
Password: YOUR_API_KEY
Config Your supabase SMTP:
- Go to your Supabase project
- Click on Project Settings in the left sidebar
- Select the Auth tab
- Find the SMTP section and toggle the Enable Custom SMTP option
Should look like this (after you enable it in supabase deashboard):
Click save and continue.
Set the API key in your environment variables.
npm install next resend
2. Setting up Environment Variables
Create a .env.local file at the root of your project and add the following line:
RESEND_API_KEY=your_resend_api_key_here
Make sure to replace your_resend_api_key_here with your actual Resend API key (and in some cases change the name to .env).
3. Creating the Email Form Component
This form allows users to input an email subject, recipient email, and message that we want to send. so the “contact page” is responsible to WHERE the email is send TO (i did it to allow you as developer to write your own personal email for testing) at later stage you can modify it to something static to change the subject/msg and add more fields.
We’ve also used useState to keep the data, but it can be done in other ways and forms, We also not doing any validation on the data at all because we are too lazy here. but we should do so (i’ll probably write a tutorial on data validation best practices react 2024 very soon).
Create the following component in your app directory:
// app/components/EmailForm.tsx
'use client'

import { useState } from "react";

export default function EmailForm() {
  const [subject, setSubject] = useState<string>("");
  const [msg, setMsg] = useState<string>("");
  const [toEmail, setToEmail] = useState<string>("");
  const [isSubmittedSuccessfully, setIsSubmittedSuccessfully] = useState<boolean>(false);

  const handleSubmit = async () => {
    const emailValues = { subject, msg, toEmail };

    const options = {
      method: 'POST',
      headers: { 'Content-Type': 'application/json' },
      body: JSON.stringify(emailValues),
    };

    try {
      const response = await fetch(`/api/send`, options);
      if (response.ok) {
        setIsSubmittedSuccessfully(true);
        const data = await response.json();
        console.log(data);
      } else {
        throw new Error("Failed to send email");
      }
    } catch (error) {
      setIsSubmittedSuccessfully(false);
      console.error("Error:", error);
    }
  };

  return (
    <form>
      {isSubmittedSuccessfully && <div>Success! Email Sent!<br /></div>}

      <label>
        <b>Subject:</b><br />
        <input type="text" onChange={(e) => setSubject(e.target.value)} value={subject} />
      </label><br />

      <label>
        <b>To (Email):</b><br />
        <input type="email" onChange={(e) => setToEmail(e.target.value)} value={toEmail} />
      </label><br />

      <label>
        <b>Message:</b><br />
        <textarea onChange={(e) => setMsg(e.target.value)}>{msg}</textarea>
      </label><br />

      <button type="button" onClick={handleSubmit}>Submit</button>
    </form>
  );
}
This component captures the subject, message, and recipient email, and upon submission, sends a POST request to /api/send. which is managed by “app folder” approach of nextjs 14 and above. Note that here we could use “action.ts” in nextjs which is highly recommended in this case, and preform the fetch from the action itself.
4. Setting Up the API Route
Now, let’s set up the API route to handle email sending. In Next.js app directory, create an API route under /api/send/route.ts. Below code is simply taking the code from the form data from the front end and assign it to resend package api call function.
Important: a best practice here is to again validate the data! you can’t and shouldn’t send any data that comes from front end without proper validation like: data length, strip HTML/JS code, restrict characters etc.
// app/api/send/route.ts
import { Resend } from 'resend';
import { EmailTemplate } from '@/components/email-template';
import * as React from 'react';

const resend = new Resend(process.env.RESEND_API_KEY);

export async function POST(req: Request) {
  const { subject, msg, toEmail } = await req.json();
  try {
    const { data, error } = await resend.emails.send({
      from: 'Acme <[email protected]>',
      to: [toEmail],
      subject,
      react: EmailTemplate({ firstName: "John", msg }) as React.ReactElement,
    });

    if (error) {
      return new Response(JSON.stringify({ error }), { status: 500 });
    }

    return new Response(JSON.stringify({ data }), { status: 200 });
  } catch (error) {
    return new Response(JSON.stringify({ error: "An error occurred while sending the email." }), { status: 500 });
  }
}
This API route receives the form data (subject, message, and recipient email), and then uses the Resend API to send the email.
5. Creating the Email Template
You can customize your email template to be more dynamic or styled. Here’s a simple template for our example:
// app/components/email-template.tsx
import * as React from "react";

interface EmailTemplateProps {
  firstName: string;
  msg: string;
}

export const EmailTemplate: React.FC<EmailTemplateProps> = ({ firstName, msg }) => (
  <div>
    <h1>Welcome, {firstName}!</h1>
    <p>{msg}</p>
  </div>
);

export default EmailTemplate;
This component dynamically creates the email body, using a “firstName” parameter (you can replace this with dynamic content as needed).
6. Deploy or test locally
Once your form and API are set up, try submitting the form, and check the console for the success message. You should also receive the email based on the toEmail provided.
Protect Domain Reputation
Your domain has reputation, and if you don’t protect it with various security and good management you might lose customers and emails won’t be send or will be send but to spam. here are some important key points regards domain reputation security.
1. Understanding Potential Threats
Bots and attackers may attempt to damage your domain’s reputation by abusing your email system. Common abuse tactics include:
- Fake user sign-ups using lists of known email addresses.
- Slow or intense waves of sign-up requests, intended to overwhelm your system.
- Denial of Service (DoS) attacks that impact important flows like password resets or sign-ins using one-time passwords.
The goals of these attacks are usually:
- To harm your email sending reputation, possibly demanding a ransom to stop.
- To disrupt your service, affecting security features like account creation or sign-ins.
- To force you into lowering your security, such as disabling email confirmations, making your platform vulnerable to further attacks like social engineering.
2. Mitigation Strategies
To protect your domain and maintain a strong email reputation, apply the following strategies:
a) Use CAPTCHA Protection
Implementing CAPTCHA can help mitigate bot-based abuse. CAPTCHA solutions, especially invisible CAPTCHA, can detect malicious bots without burdening legitimate users. This will prevent automated systems from flooding your sign-up process and protect your email sending reputation from being abused by attackers.
b) Use Social Login or SSO
Instead of relying on email-based authentication, prefer social login (OAuth) or Single Sign-On (SSO) using SAML. These methods are more secure and less prone to abuse since they shift the authentication burden to trusted third-party identity providers, reducing your exposure to attacks targeting your email system.
c) Adopt Passwordless Authentication
Using passwordless authentication methods like one-time passwords (OTPs) or magic links limits the potential value attackers can gain from spamming sign-ups. OTPs offer a more secure login experience and minimize the risk of account takeovers.
d) Do Not Disable Email Confirmations
Under no circumstances should you disable email confirmations due to pressure from attackers. Email confirmation is a crucial security measure that ensures only legitimate users can activate accounts. Disabling this feature could open the door to further abuse, such as attackers registering accounts in victims’ names, which could lead to social engineering attacks.
3. Additional Best Practices
- Monitor email traffic closely: Set up monitoring tools to detect unusual spikes in email traffic or failed sign-up attempts.
- Rate-limit requests: Introduce rate-limiting to ensure bots cannot overwhelm your system with multiple requests in a short amount of time.
- Stay informed: Regularly update your system against the latest attack vectors and stay informed about potential vulnerabilities.
By following these strategies, you can effectively protect your domain’s email reputation and maintain the integrity of your application.
Summary:
- You created a form component to gather user input.
- You set up a Next.js API route to handle sending emails using Resend.
- You created a dynamic email template.
- Finally, you tested the flow to ensure that emails are sent successfully.
Let me know if you encounter any issues!

Lior Amsalem embarked on his software engineering journey in the early 2000s, Diving into Pascal with a keen interest in creating, developing, and working on new technologies. Transitioning from his early teenage years as a freelancer, Lior dedicated countless hours to expanding his knowledge within the software engineering domain. He immersed himself in learning new development languages and technologies such as JavaScript, React, backend, frontend, devops, nextjs, nodejs, mongodb, mysql and all together end to end development, while also gaining insights into business development and idea implementation.
Through his blog, Lior aims to share his interests and entrepreneurial journey, driven by a desire for independence and freedom from traditional 9-5 work constraints.
Leave a Reply